
利用Navidrome+Alist动手搭建一个属于自己的音乐服务器
实现方法:Navidrome+Alist,通过alist挂载其他网盘,如阿里云盘,百度云盘等,实现听歌自由。
1.首先需要有一个云服务器或者其他安装了linux的机器,安装好docker,docker安装教程参考(https://docs.docker.com/engine/install/centos/)。我以腾讯的云服务器为例,安装的是centos7系统。
2.安装Alist,推荐使用docker安装,安装教程参考(https://alist.nn.ci/zh/guide/install/docker.html)。Alist中绑定你的网盘,具体配置方法请查阅alist官方文档。
3.1服务器安装rclone,一键安装脚本:curl https://rclone.org/install.sh | sudo bash
3.2使用rclone挂载Alist:
3.2.1 输入reclone config进入reclone配置,并输入n新建一个remote

3.2.2 为remote取名,名字随意,此处我以alist为名字

3.2.3 上述操作完成之后会列出一个支持列表,选择存储类型,此处选择webdav,从列出的选项可知输入47(注意:根据版本的不同,此处的数字可能会有变化,选择webdav对应的编号即可,请自行选择自己机器上列出的选项),如下:
Option Storage.
Type of storage to configure.
Choose a number from below, or type in your own value.
1 / 1Fichier
\ (fichier)
2 / Akamai NetStorage
\ (netstorage)
3 / Alias for an existing remote
\ (alias)
4 / Amazon Drive
\ (amazon cloud drive)
5 / Amazon S3 Compliant Storage Providers including AWS, Alibaba, ArvanCloud, Ceph, China Mobile, Cloudflare, GCS, DigitalOcean, Dreamhost, Huawei OBS, IBM COS, IDrive e2, IONOS Cloud, Liara, Lyve Cloud, Minio, Netease, Petabox, RackCorp, Scaleway, SeaweedFS, StackPath, Storj, Tencent COS, Qiniu and Wasabi
\ (s3)
6 / Backblaze B2
\ (b2)
7 / Better checksums for other remotes
\ (hasher)
8 / Box
\ (box)
9 / Cache a remote
\ (cache)
10 / Citrix Sharefile
\ (sharefile)
11 / Combine several remotes into one
\ (combine)
12 / Compress a remote
\ (compress)
13 / Dropbox
\ (dropbox)
14 / Encrypt/Decrypt a remote
\ (crypt)
15 / Enterprise File Fabric
\ (filefabric)
16 / FTP
\ (ftp)
17 / Google Cloud Storage (this is not Google Drive)
\ (google cloud storage)
18 / Google Drive
\ (drive)
19 / Google Photos
\ (google photos)
20 / HTTP
\ (http)
21 / Hadoop distributed file system
\ (hdfs)
22 / HiDrive
\ (hidrive)
23 / In memory object storage system.
\ (memory)
24 / Internet Archive
\ (internetarchive)
25 / Jottacloud
\ (jottacloud)
26 / Koofr, Digi Storage and other Koofr-compatible storage providers
\ (koofr)
27 / Local Disk
\ (local)
28 / Mail.ru Cloud
\ (mailru)
29 / Mega
\ (mega)
30 / Microsoft Azure Blob Storage
\ (azureblob)
31 / Microsoft OneDrive
\ (onedrive)
32 / OpenDrive
\ (opendrive)
33 / OpenStack Swift (Rackspace Cloud Files, Blomp Cloud Storage, Memset Memstore, OVH)
\ (swift)
34 / Oracle Cloud Infrastructure Object Storage
\ (oracleobjectstorage)
35 / Pcloud
\ (pcloud)
36 / PikPak
\ (pikpak)
37 / Put.io
\ (putio)
38 / QingCloud Object Storage
\ (qingstor)
39 / SMB / CIFS
\ (smb)
40 / SSH/SFTP
\ (sftp)
41 / Sia Decentralized Cloud
\ (sia)
42 / Storj Decentralized Cloud Storage
\ (storj)
43 / Sugarsync
\ (sugarsync)
44 / Transparently chunk/split large files
\ (chunker)
45 / Union merges the contents of several upstream fs
\ (union)
46 / Uptobox
\ (uptobox)
47 / WebDAV
\ (webdav)
48 / Yandex Disk
\ (yandex)
49 / Zoho
\ (zoho)
50 / premiumize.me
\ (premiumizeme)
51 / seafile
\ (seafile)
Storage> 47 # 选择存储类型,此处选择webdav,从上面列出的选项可知输入47(注意:根据版本的不同,此处的数字可能会有变化,请自行选择自己机器上列出的选项)
3.2.4 接下来填写webdav的地址,输入webdav的地址,此处使用的是alist的webdav地址,请根据自己安装的alist进行填写,一般格式为“http://ip:端口号/dav/”,例如“http://192.168.4.1:5244/dav/”:

3.2.5 选择供应商,填写other即可:

3.2.6 输入webdav的用户名,此处我以输入centos为例,请输入你自己webdav的用户名:

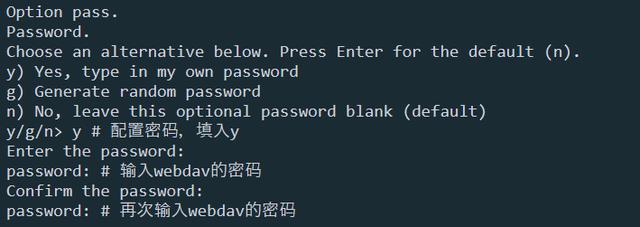
3.2.7 配置密码,输入y,之后输入两次你的webdav密码:
3.2.8 后面三项选择默认即可,分别输入“回车,n,y”
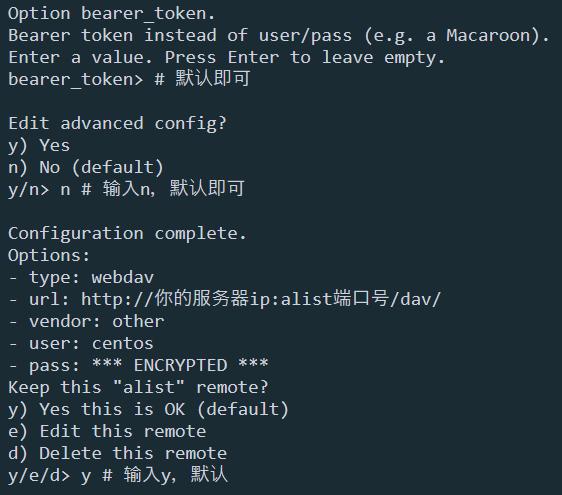
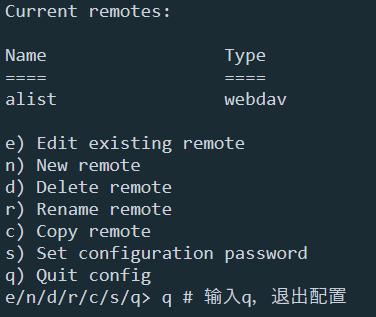
3.2.9 以上步骤完成之后,应当出现以下信息,最后输入q退出即可:
3.2.10 此时我们只是完成了rclone的安装和alist的绑定,接下来输入以下代码将alist挂载到系统:
rclone mount 远程名称(也就是上面配置的name):/ 你需要挂载到本地的地址(例如/home/alist) –cache-dir /tmp –allow-other –vfs-cache-mode writes –header “Referer:https://www.aliyundrive.com/drive”
示例:
rclone mount alist:/ /home/alist –cache-dir /tmp –allow-other –vfs-cache-mode writes –header “Referer:https://www.aliyundrive.com/drive”
若需要保持在后台运行,可在前面加入nohup命令,即:
nohup rclone mount alist:/ /home/alist –cache-dir /tmp –allow-other –vfs-cache-mode writes –header “Referer:https://www.aliyundrive.com/drive”
注意:如果有以下报错:Fatal error: failed to mount FUSE fs: fusermount: exec: “fusermount3”: executable file not found in $PATH,则需要安装fuse3,使用以下命令安装即可:yum -y install fuse3
3.2.11 一切正常的情况下,此时使用命令“cd /home/alist”,将会看到我们webdav里面的文件。
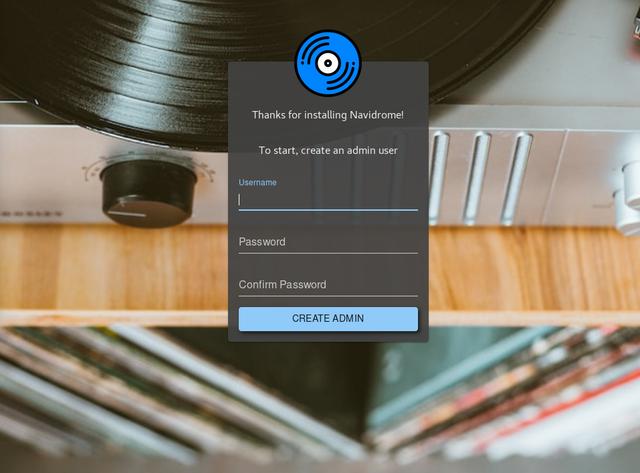
4.安装Navidrome,推荐docker安装,安装教程参考(https://www.navidrome.org/docs/installation/docker/)。此时安装命令中需要修改的地方请看下图:

5.服务器开启4533端口(如果修改了的话,就开启修改的端口)。
6.使用浏览器访问“服务器ip:4533”,首先会让你配置管理员账号,根据提示配置即可。
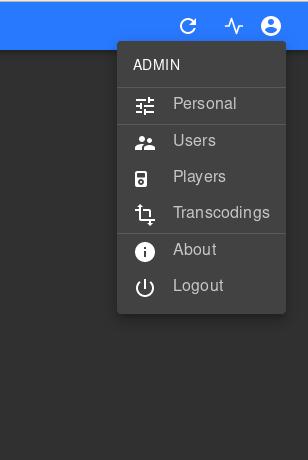
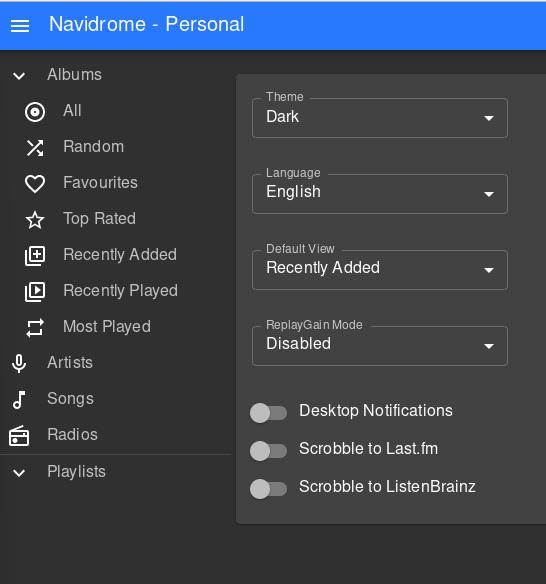
7.登录之后,点击右上角设置,点击Personal,可进行个性化设置,如主题和语言等。
8.如果前面的步骤都正常进行了的话,打开这个网站的时候会看到正在扫描歌曲,歌曲量大的话会扫描较长时间。